Tutorial on MapReduce Installation
MapReduce – Installation:
MapReduce works only on Linux operating systems and it comes inbuilt with a Hadoop framework.
In ordered to install the Hadoop your system should have Java. If your system doesn’t have the Java. Firstly install Java on your machine.
Hadoop Installation:
Hadoop must be installed on your machine before you are going to install MapReduce. Check your system whether your system having Hadoop or not using code.
| $ hadoop version |
If your system has the Hadoop then you will get the message.
Hadoop 2.4.1 — Subversion: https://svn.apache.org/repos/asf/hadoop/common -r 1529768 Compiled by hortonmu on 2013-10-07T06:28Z Compiled with protoc 2.5.0 From source with checksum 79e53ce7994d1628b240f09af91e1af4 |
If Hadoop is not installed then fallow bellow process.
Downloading Hadoop:
Download Hadoop 2.4.1 from Apache Software Foundation and extract its contents using the following commands.
$ su password: # cd /usr/local # wget: http://apache.claz.org/hadoop/common/hadoop-2.4.1/ hadoop-2.4.1.tar.gz # tar xzf hadoop-2.4.1.tar.gz # mv hadoop-2.4.1/* to hadoop/ # exit |
Installing Hadoop in Pseudo-Distributed mode:
The following steps are used to install Hadoop 2.4.1 in pseudo distributed mode.
Step 1 − Setting up Hadoop:
You can set Hadoop environment variables by appending the following commands to a ~/.bashrc file.
export HADOOP_HOME=/usr/local/hadoop export HADOOP_MAPRED_HOME=$HADOOP_HOME export HADOOP_COMMON_HOME=$HADOOP_HOME export HADOOP_HDFS_HOME=$HADOOP_HOME export YARN_HOME=$HADOOP_HOME export HADOOP_COMMON_LIB_NATIVE_DIR=$HADOOP_HOME/lib/native export PATH=$PATH:$HADOOP_HOME/sbin:$HADOOP_HOME/bin |
Apply all the changes to the current running system.
| $ source ~/.bashrc |
Step 2 − Hadoop Configuration:
You can find all the Hadoop configuration files in the location “$HADOOP_HOME/etc/hadoop”. You need to make suitable changes in those configuration files according to your Hadoop infrastructure.
| $ cd $HADOOP_HOME/etc/hadoop |
In order to develop Hadoop programs using Java, you have to reset the Java environment variables in hadoop-env.sh file by replacing the JAVA_HOME value with the location of Java in your system.
| export JAVA_HOME=/usr/local/java |
You have to edit the following files to configure Hadoop −
1) core-site.xml
2) hdfs-site.xml
3) yarn-site.xml
4) mapred-site.xml
Core-site.xml:
Core-site.xml contains the following information−
- Port number used for Hadoop instance
- Memory allocated for the file system
iii. Memory limit for storing the data
- Size of Read/Write buffers
Open the core-site.xml and add the following properties in between the and tags.
fs.default.name hdfs://localhost:9000 |
Hdfs-site.xml:
Hdfs-site.xml contains the following information −
- i)Value of replication data
- ii) The namenode path
iii) The datanode path of your local file systems (the place where you want to store the Hadoop infra)
Let us see the following data.
dfs.replication (data replication value) = 1 (In the following path /hadoop/ is the user name. hadoopinfra/hdfs/namenode is the directory created by hdfs file system.) namenode path = //home/hadoop/hadoopinfra/hdfs/namenode (hadoopinfra/hdfs/datanode is the directory created by hdfs file system.) datanode path = //home/hadoop/hadoopinfra/hdfs/datanode |
Open this file and add the following properties in between the, tags.
dfs.replication 1 dfs.name.dir file:///home/hadoop/hadoopinfra/hdfs/namenode dfs.data.dir file:///home/hadoop/hadoopinfra/hdfs/datanode |
Note – According to the above file, all the property values are user-defined and you can make changes according to your Hadoop infrastructure.
Yarn-site.xml:
This file is used to configure yarn into Hadoop. Open the yarn-site.xml file and add the following properties in between the, tags.
yarn.nodemanager.aux-services mapreduce_shuffle |
mapred-site.xml:
This file is used to specify the MapReduce framework we are using. By default, Hadoop contains a template of yarn-site.xml. First of all, you need to copy the file from mapred-site.xml.template to mapred-site.xml file using the following command.
| $ cpmapred-site.xml.template mapred-site.xml |
Open mapred-site.xml file and add the following properties in between the, tags.
mapreduce.framework.name yarn |
Verifying Hadoop Installation:
The below steps are used to verify the Hadoop installation.
Step 1 − Name Node Setup:
Set up the namenode using the command “hdfsnamenode -format” as below
$ cd ~ $ hdfsnamenode -format |
The expected result is
10/24/14 21:30:55 INFO namenode.NameNode: STARTUP_MSG: /************************************************************ STARTUP_MSG: Starting NameNode STARTUP_MSG: host = localhost/192.168.1.11 STARTUP_MSG: args = [-format] STARTUP_MSG: version = 2.4.1 … … 10/24/14 21:30:56 INFO common.Storage: Storage directory /home/hadoop/hadoopinfra/hdfs/namenode has been successfully formatted. 10/24/14 21:30:56 INFO namenode.NNStorageRetentionManager: Going to retain 1 images with txid>= 0 10/24/14 21:30:56 INFO util.ExitUtil: Exiting with status 0 10/24/14 21:30:56 INFO namenode.NameNode: SHUTDOWN_MSG: /************************************************************ SHUTDOWN_MSG: Shutting down NameNode at localhost/192.168.1.11 ************************************************************/ |
Step 2 − Verifying Hadoop dfs:
Execute the below command to start Hadoop file system.
| $ start-dfs.sh |
The expected output is
10/24/14 21:37:56 Starting namenodes on [localhost] localhost: starting namenode, logging to /home/hadoop/hadoop- 2.4.1/logs/hadoop-hadoop-namenode-localhost.out localhost: starting datanode, logging to /home/hadoop/hadoop- 2.4.1/logs/hadoop-hadoop-datanode-localhost.out Starting secondary namenodes [0.0.0.0] |
The below command is used to start the yarn script. Executing this command will start your yarn daemons.
Step 3 − Verifying Yarn Script:
| $ start-yarn.sh |
The expected output is
starting yarn daemons starting resourcemanager, logging to /home/hadoop/hadoop- 2.4.1/logs/yarn-hadoop-resourcemanager-localhost.out localhost: starting node manager, logging to /home/hadoop/hadoop- 2.4.1/logs/yarn-hadoop-nodemanager-localhost.out |
Step 4 − Accessing Hadoop on Browser:
The default port number to access Hadoop is 50070. Use the below URL to get Hadoop services on your browser.
| http://localhost:50070/ |
The below screenshot shows the Hadoop browser.

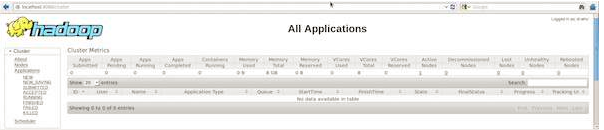
Step 5 − Verify all Applications of a Cluster:
The default port number to access all the applications of a cluster is 8088. Use the following URL to use this service.

Mahesh J
Author
Hello all! I’m a nature’s child, who loves the wild, bringing technical knowledge to you restyled.