AWS CLI Guide – Best Practices
What is Amazon Command Line Interface?
The AWS Command Line Interface (CLI) is a tool that you can use to download, manage and configure AWS services. You can control multiple AWS services from the command line and automate them through scripts.
How to setup AWS CLI:-
Before you start using the AWS Command Line Interface, you have to sign up for an AWS account and set up your CLI environment. Depending on your operating system there are different ways to install the AWS CLI.
The following steps will help you to install AWS CLI:-
1) Sign up with AWS
2) Install the AWS Command Line Interface
3) Configure the AWS Command Line Interface.
You can sign up using the AWS Management Console. You can also use IAM access keys instead of AWS account access keys.
IAM keeps your account secure and controls access to AWS services.
How to Sign Up for Amazon Web Services:
To use Amazon Web Services, you have to sign up for an AWS account:-
1) Open http://aws.amazon.com,then click “Sign Up”
2) Follow the on-screen instructions.
3) Part of the sign-up procedure you will receive a phone call and have to verify your account by entering PIN.
At any time, you can view your current account and manage your account by going through this and clicking My Account/Console.
Here are the some keys which we use while creating an account in AWS console.
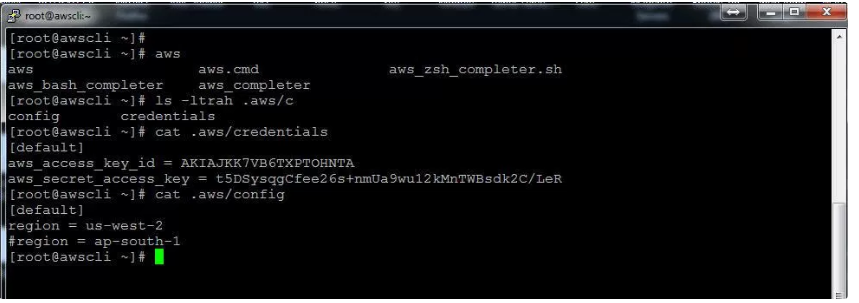
a) Region – AWS region to call your requests.
b) Output – The Command output format
c) AWS_ACCESS_KEY_ID – AWS access key.
d) AWS_SECRET_ACCESS_KEY – AWS secret key.
Access and secret key credentials stored in credential and configure files.
Once the configuration completes, it will create ‘.aws’ folder in user’s home directory along with configure file and credentials like below.
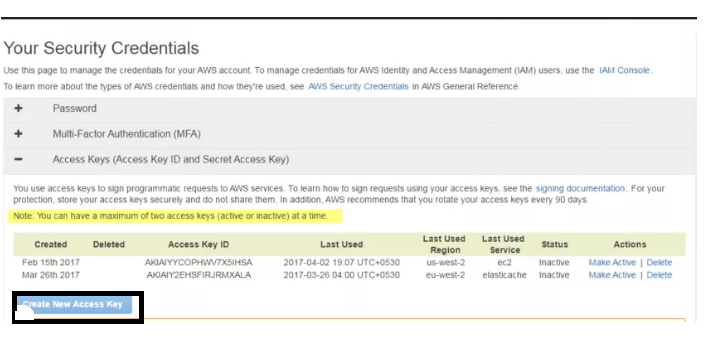
You can sign up with AWS by using Access keys. Here you can create access keys by using the AWS Management Console.
Installation of Command Line Interface:
There are different ways to install the AWS CLI on your machine, depending on what operating system you are using. For example,
1) On Microsoft Windows – use the MSI installer
2) On Linux, OS X, or UNIX – use pip or install manually using bundled installer. On Linux, you can use the bundled installer to install the AWS CLI.
Install the AWS CLI Using the Bundled Installer (Linux):
The bundled installer handles all the details in setting up an isolated environment for the AWS CLI and its dependencies.
Note: The bundled installer does not support installing to paths that contain spaces.
Requirements:
1) Linux, OS X, or UNIX
2) Python 2.6.3 or later
$ Python –version
If your computer doesn’t have Python installed,
1) Download the Python package for your operating system.
2) Install Python by following the instructions in the README file (Linux, OS X, or UNIX).
To install the AWS CLI using the bundled installer follow these steps:-
1) Download the AWS CLI Bundled Installer.

2) Unzip the package.

3) Run the install executable.

Install the AWS CLI without Sudo (Linux, macOS, or UNIX)
If you want to install Sudo, you have to use the modified version of commands as shown below:-

This installs the AWS CLI to the default location as (~/.local/lib/aws) and creates a symbolic link as (symlink) at ~/bin/aws.
The benefits of using the bundled installer:
1) By using the bundled installer, you are assured to have the latest version of AWS CLI.
2) The bundled installer includes the AWS CLI, its dependencies and manipulation, program execution perform the installation for you.
The benefits of using the AWS CLI:
1) You can develop shell scripts to manage resources
2) You have direct access to the AWS services’ public APIs.
3) You can use all of the functionality provided by the AWS Management Console.
4) Provides low level commands for complete control and high level commands which simplify using a complex service.
Test the AWS CLI Installation:
Hope, you have installed AWS CLI on your computer. You may think that what next? To do.
Here are some suggestions to test AWS CLI after installation,
1) List all your users and display the output in a table:

2) List all your EC2 tags:

3) Play around with outputs and help:

Here, you can go through all materials regarding AWS. Therefore, these blogs are more helpful to get more information.

Nitesh
Author
Bonjour. A curious dreamer enchanted by various languages, I write towards making technology seem fun here at Asha24.